We have this basic web shop for alternative music, once build in MVC. However the customer asked to have more freedom to edit pages and content. Being a Umbraco adept, we had no other possibility to move to Umbraco.
Instead of rebuilding everything we looked at our possibilities.
- Create a sub domain: http://shop.mydomain.com an put the shop on the subdomain.
That would mean we have 2 projects in our Visual studio solution. It would work very quickly, but we will be struggling with showing logged in users across the different domains.
- Create a application folder: http://www.mydomain.com/shop/ . This would enable us to continue to work as we are busy. But we would need to maintain 2 different layouts.
- Create an Umbraco website and copy some “legacy” MVC code to the new site.
- Add Umbraco to the MVC application using NuGet.
In the past we already tried the first 2 solutions, and you always have some issues when upgrading 1 site, but forgetting to upgrade the latter. The third solution was not as easy as we stumbled in compilation issues whole the time.
DISCLAMER: We are trying to get somewhere as quick as possible. We are taking shortcuts. Throwing best practices over board.
The MVC implementation for Umbraco
The MVC for umbraco in the documentation introduces new concepts which might take some time to understand. You have thinks like surface controllers and custom controllers, … The question was: do we convert all controllers to custom controllers. Do we create special document types? Do we need to move our views.
We needed a “quick & dirty” solution. Time is money. And customers tend not to have endless budgets. All these nice things do not enable you to do a fast migration to Umbraco. When rebuilding a complete site, we could have done it with all the MVC customized Umbraco goodness like custom & surface controllers. But for now we decided to move our shop to an MVC Area.
It was the blog post of Aaron about MVC in Umbraco 4, which set us in the right direction. What we will be describing here was already in the documentation: Custom MVC Routes. Only a little bit more condensed.
Here is our step by step guide…
Prepare your MVC app
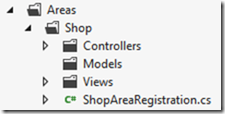
First we started moving all our controllers & Views to an area.

It’s not too hard. Move the Controllers, views and Models. (Update the namespaces.). We left the _layout.cshtml in the /Views/Shared folder for now.
Verify that you don’t have any special routes or configuration in your global.asax. The global ASAX will be skipped by umbraco. We will explain further how to run this code anyway.
Add umbraco to the solution
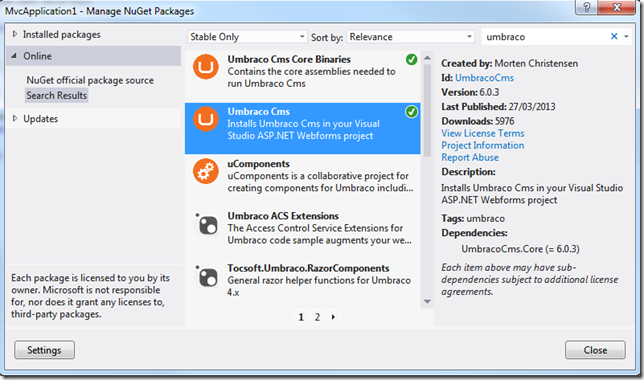
Right click references in the MVC application and choose “Manage NuGet Packages”

And install the “Umbraco CMS” NuGet Package. The “umbraco CMS core binaries” will be automatically added.

Or use the Package Manager Console if you wish too.
Update Web.config
We added our MVC Area (“Shop”) to the umbracoReservedPaths in the Web.config.
<add key="umbracoReservedPaths" value="~/umbraco,~/install/,~/Shop/"/>
Register your MVC Area using custom routes.
Add a new class. Where you attach the startup handlers for MVC. For consistency I added this file in the App_Start folder.
The class should implement the IApplicationEventHandler interface or use the umbraco v6 ApplicationEventHandler class. Add the MVC Area registration to the application started event. Or add your custom routesto controllers if you don’t want to use areas (but don’t forget to update your appSettings umbracoReservedUrls). This class will be picked up by Umbraco automatically on startup of the application. It kind of replaces the global.asax.
using System.Web.Mvc;
using Umbraco.Core;
public class MvcStartup : IApplicationEventHandler
{
public void OnApplicationInitialized(UmbracoApplicationBase umbracoApplication, ApplicationContext applicationContext)
{
}
public void OnApplicationStarting(UmbracoApplicationBase umbracoApplication, ApplicationContext applicationContext)
{
AreaRegistration.RegisterAllAreas();
}
public void OnApplicationStarted(UmbracoApplicationBase umbracoApplication, ApplicationContext applicationContext)
{
}
}
Don’t forget to add or rework any other special code you had in the global.asax before starting the “upgrade” to umbraco.
setup your umbraco as usual
- Open the root and setup the database
- Set MVC as your “defaultRenderingEngine” in umbracoSettings.config.
- …
Taking your solution one step further
For now, be happy and don’t try to take this “further”.
If you want to use your existing _Layout. You will quickly see that you can inherit your _layout Shared View from UmbracoTemplatePage like this:
@inherits Umbraco.Web.Mvc.UmbracoTemplatePage
This will throw compilation errors because you are probably returning custom objects! Solving this issue would be beyond the scope of our simple solution. If we ever get into this direction, we will take care to put up a new blog post about our path.
Enjoy, you are running your Custom MVC route in umbraco!
So that’s it. What is your experience with upgrading MVC to umbraco? Did you took the same approach? What would (or have) you done to merge umbraco into your existing MVC applications?
One small last note: special thanks to Raoul Jacobs for going through this together.